Three Easy Steps to Get a NetBackup Scale-Out Cluster Configured and Ready to Protect Your Data

NetBackup Flex Scale is a highly optimized pay-as-you-grow scale-out solution for enterprise data protection. It includes automated processes that simplify management of the cluster infrastructure. One such example is for initial configuration, you simply use the intuitive GUI (or APIs if you prefer) that takes the complexity away from configuring a multi-node cluster. The initial configuration takes only a few minutes of your time and then an automated process takes over and manages the entire installation and configuration for you.
When complete, you’ve got a highly available NetBackup scale-out solution that includes a single scalable domain and storage unit, ready to discover your assets and start protecting your data.
A NetBackup Flex Scale cluster requires a minimum of four nodes which come shipped to you with the NetBackup Flex Scale software pre-installed. The configuration can be done in three easy steps:
- Step 1: Physically add the nodes to your data center (racking the nodes, connecting them to power, and network switches) and turn them on.

- Step 2: Configure an IP on one of the nodes management ethernet ports.

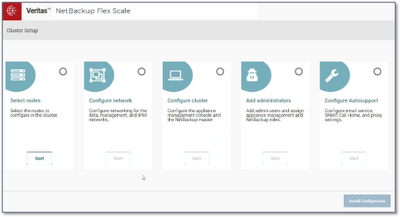
- Step 3: Connect to the built-in web interface using the IP you configured in the previous step (or use this IP for API calls). Provide the configuration details either manually or in a simple yaml-based configuration file.
- The yaml configuration file contains simple syntax of all the details needed to fully configure the cluster and helps eliminate user error.
- A template is included with the proper syntax to simplify configuring the yam file.
- If you use the cluster setup wizard, you simply import the yaml file and validate the auto-populated configuration details.

That’s it!
The nodes come pre-installed with the NetBackup Flex Scale software which includes a hardened operating system and all the necessary drivers and patches. So when you are finished providing the configuration details, an automated process kicks off and completes the entire setup for you, including:
- Security configuration to eliminate root account access to the appliance, allowing only the host admin account permission to login to compute nodes. Account policies are used to allow elevated users access to run certain administrative commands and shell and web UI operations.
- Networking is configured, including:
- Host names, cluster name, and IPv4 or IPv6 addresses. You can add individually or specify a range, for:
- Data/public network used for NetBackup operational data traffic, including communication with external hosts and services
- Can be 10G or 25G
- Support for NIC bonding and VLANs
- Supported bonding methods include: 802.3ad, balance-rr, balance-xor, broadcast, active-backup, balance-tlb, balance-alb
- Cluster/private network used for cluster internode communication including clustered filesystem I/O
- Two 25GbE ports/node use multiplexed connections to provide 50GbE aggregate available throughput for inter-cluster communication (bonding not required)
- Incredibly efficient and highly performant network utilizing UDP
- Management network, for cluster management traffic. This can be configured to be routed over the data network or over a separate management network.
- Optionally IPMI is configured for remote console access to each node and customer host files can be created
- DNS, NTP, gateway
- Configuring MTU including support for jumbo frames
- Data/public network used for NetBackup operational data traffic, including communication with external hosts and services
- The cluster is configured, including:
- a management console
- containerized instances of NetBackup services
- clustered file systems that provide both high performance and high levels of resiliency for both the backup data and the associated metadata
- I/O traffic is run across a 25 G network using UDP and LLP for network performance optimization that provides superior performance over TCP.
- User accounts with role-based access control for both NetBackup administration and infrastructure management. Users can be assigned individual roles or both roles.
- Licenses are added, existing NetBackup software licenses can be used
- Optionally AutoSupport will be configured to provide call-home and alert management
- Host names, cluster name, and IPv4 or IPv6 addresses. You can add individually or specify a range, for:
- Networking is configured, including:
Once the automated configuration is complete you can login to NetBackup where you will see it has been fully configured, including:
- A new NetBackup domain
- A single scalable storage unit that is highly available and ready to store and protect your backup data
- NetBackup containerized services are running and configured for high availability with built-in container management software
- Integrated intelligent load balancing that ensures the work is balanced optimally across the nodes in the cluster in a way that provides much better performance than simple round-robin load distribution that doesn’t account for things like system resource utilization or concurrent active jobs
- Catalog protection (snapshot and protection policy)
From here you are ready to discover your assets and start protecting your workloads.
It’s that easy!
Check out my demo to see for yourself how easy it is to get a NetBackup Flex Scale cluster running.
For more information on NetBackup Flex Scale, check out this white paper or visit the Appliance Solutions page on Veritas.com and watch the recorded NetBackup Flex Scale announcement and technical breakout sessions from the Conquer Every Cloud Virtual Conference.
